
Blog.
Hot‑Air Flooring Welding: Leister Basics, Temperatures, And Tidy Seams
Feb
Hot‑Air Flooring Welding: Leister Basics, Temperatures, And Tidy Seams
Clean, durable seams lift a vinyl or linoleum install from good to great. If you are gearing up for late‑winter commercial refits, hot‑air welding is the fast, reliable way to create hygienic, watertight joins that stand up to trolley traffic and daily cleans. This guide covers the core technique, safe UK site practice, the tools you need, and the settings that keep your welds neat with minimal scorch or smear. You will also find practical answers to the most common questions fitters ask on site.
What a hot‑air welder does and when to use it
A hot air welder is used to join compatible thermoplastic materials by heating both the flooring edges and the welding rod until they reach fusion temperature, then consolidating them as one continuous seam. In flooring, you use it on homogeneous and heterogeneous vinyl, and on linoleum with a matching cord, to create strong, cleanable seams in schools, healthcare, food prep and retail.
A heat gun can weld plastic if, and only if, it provides controlled temperature and airflow with the correct nozzles. Purpose‑built flooring welders and nozzles make the process precise and repeatable. That is why pros favour a Leister for consistent results shift after shift.
What plastics cannot be welded? Thermosets and many blends that do not re‑melt cannot be fusion welded. Examples include epoxy composites and phenolics. Some plastics are technically thermoplastic but are compound blends or have additives that make welding unreliable without specific rod and process testing.
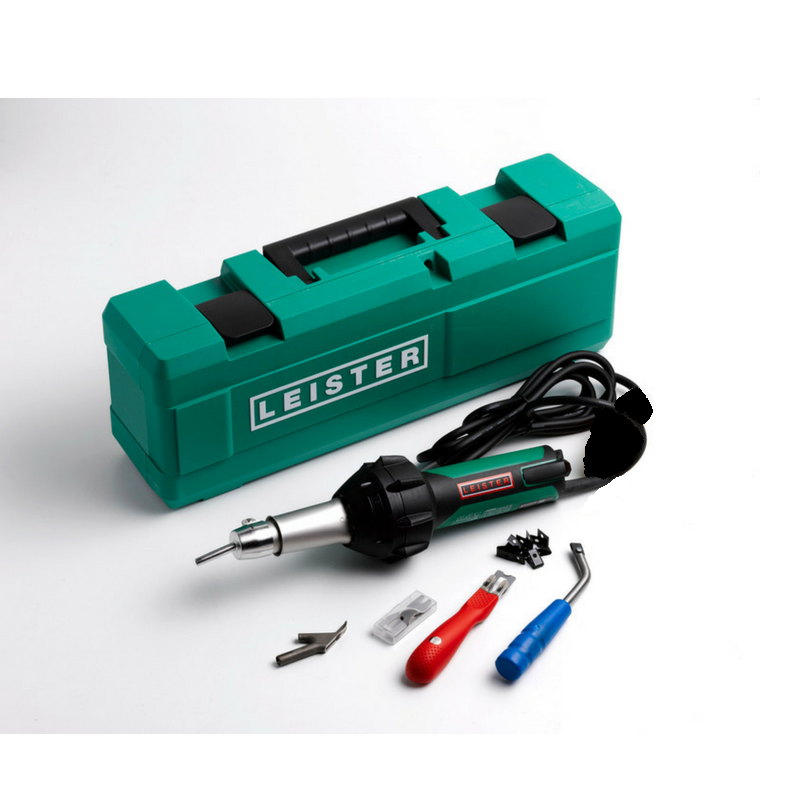
Leister tools and nozzles, explained
What is a Leister used for? Leister makes professional hot‑air tools and automatic welding machines trusted for resilient floors, roofing and plastics fabrication. For hand welding floors, the classic choice is a compact, adjustable gun with a push‑fit nozzle system. For long corridors and repetitive seams, an automatic welder keeps speed and temperature rock steady.
- Gun types: hand welder for detail and short runs; automatic welder for straight seams over distance.
- Nozzles: standard 5 mm high‑speed nozzle for most vinyl rods, 4 mm for narrow cords, slot nozzles for overlap tacking, and reduction nozzles to concentrate heat in corners.
- Accessories: seam rollers, speed tips matched to rod diameter, trimming knives, skiving guides and edge sealer bottles.
You can source a Leister welder and compatible nozzles, tips and cords under our welding tools category. If you already have the gun, keep a spare element and fresh tips in your case to avoid downtime mid‑refit.
Temperatures, airflow and speed
How hot is the air that comes out of a hot air welder? Hand welders typically deliver 100 to 650°C at the nozzle. Flooring welds generally sit between 350 and 500°C at the tip depending on material, rod diameter and site conditions. Cold rooms and heavy substrates pull heat out of the seam, so you may need a notch more temperature or a slower pace in winter.
Vinyl: start around 420 to 480°C at the tip with medium airflow. Look for a satin gloss behind the nozzle and a slight roll of melt at the rod edges.
Linoleum: typically 350 to 420°C. Linoleum chars easily, so keep airflow steady, reduce dwell and use a smooth forward feed.
Airflow: too high blows the melt out and scorches edges; too low starves the seam and under‑bonds. Aim for a stable, laminar flow from the speed nozzle.
Speed vs heat: set the temperature, then adjust travel speed until the bond is full‑depth without burn or smear. If the rod sinks below the surface before first trim, you are too slow or too hot. If the rod sits high and brittle, you are too fast or too cool.
What is the best temperature for hot air soldering? Hot air soldering is a different trade. Electronics work usually targets 260 to 400°C at the nozzle for solder reflow. For flooring, follow the figures above and manufacturer data for your rod and sheet.
Rod selection and compatibility
Match the rod polymer to the flooring. PVC vinyl uses PVC rod. Linoleum uses natural lino rod. Colour match matters for appearance, but chemistry match is non‑negotiable for seam strength. Check rod diameter against your groove width so the cord fills the profile without starving the bond.
UK site safety, ventilation and PPE
- Ventilation: use local extraction in enclosed areas. Warm adhesives and cleaning chemicals can add vapours in cold months.
- PPE: safety glasses, cut‑resistant gloves for trimming, heat‑resistant gloves for nozzle changes, knee pads, and hearing protection where automatic welders or floor sanders are in use.
- Hot work awareness: keep nozzles parked on heat stands, never on vinyl. Allow tools to cool before packing. Tape and signage for live hot works when the public is nearby.
Step by step for tidy seams
Floor preparation
Ensure the subfloor is flat, smooth and dry. Good floor preparation avoids hollows that telegraph through seams. Vacuum thoroughly and check for adhesive squeeze in the seam path.
Scribe and cut
Dry fit the sheets, scribe edges to a tight net, and adhesive‑bond as specified. Roll the field and seams properly before welding.
Groove the seam
After adhesive cure, centre your groover on the join. Groove to around two thirds of the sheet thickness, clean and even. Vacuum the channel.
Trial heat
Warm a short offcut to confirm temperature and speed. Look for a uniform melt bead.
Weld
Feed the rod through a 5 mm speed nozzle for 5 mm rod. Keep the gun perpendicular, lead with the nozzle, and maintain a steady pace. At ends and junctions, switch to a standard nozzle and finish by hand for accuracy.
First pass trim
When the rod skins but is still warm, take the crown off with a quarter‑moon knife and slide guide. This prevents dragging the rod out.
Second pass trim
Once fully cool, remove the remaining proud material with the quarter‑moon knife without the guide. Aim for a flush, invisible seam.
Edge seal and clean
For vinyl, a light wipe with manufacturer‑approved cleaner. For linoleum, apply the recommended edge sealer where specified to protect against ingress.
Basic tools you will need
- Hot air welder with speed nozzle set, spare element and heat stand
- Seam groover, manual or powered
- Quarter‑moon knife plus slide guide
- Seam roller and small hand roller
- Hook and straight blades, plus a sharp utility knife
- Edge sealer and applicator bottle
- Scrapers, vacuum and solvent wipes for cleanup
Leister care and maintenance
- Nozzles: keep clean. Carbon build‑up insulates and scorches edges. Let the tool cool, then brush or wipe nozzles.
- Elements: replace at the first signs of flicker, slow heat or airflow changes.
- Filters: if your model has an air intake screen, clear dust weekly to maintain stable temperature.
- Leads and plugs: check for nicks and heat fatigue, especially after cold‑weather work.
- Storage: cool fully, coil cables loosely, and keep the kit dry. In winter, warm tools gradually on site before setting full heat.
Timing your refit
Late winter is prime time for education, healthcare and retail refits. Order weld rod, tips and spare elements with the sheets to avoid delays. If you also have uplift or sanding scheduled, line up flooring removal tools and floor sanders early so subfloor works do not hold up welding days.
Quick answers to common questions
- What is a hot air welder used for? For fusing compatible thermoplastics, such as vinyl and linoleum seams in flooring, into a strong continuous joint.
- How hot is the air? Typically 100 to 650°C at the nozzle. Flooring welds commonly sit between 350 and 500°C at the tip.
- What plastics cannot be welded? Thermosets and some blends or filled compounds that do not re‑melt or are chemically incompatible.
- What is the best temperature for hot air soldering? Electronics soldering often runs 260 to 400°C, which is separate from flooring figures.
- What are the basic tools needed for welding? A hot air welder, matched nozzles, groover, welding rod, quarter‑moon knife with guide, seam roller and a sharp utility knife.
Wrap up
Mastering speed against heat, with the right rod and a clean groove, is the secret to tidy, durable seams. Choose a dependable Leister welder, set your temperature to suit the material and room conditions, and trim in two passes for a flush finish. Stock your nozzles, rods and blades before the refit window opens, and keep your gun clean for consistent heat all season. When you are ready to kit up or top up, explore our vinyl welder selection and related welding tools, all ready for fast UK dispatch.